Opening Class Registration
How registration fits together
Registration has five layers, and each one depends on the one before it. A class lives inside a term, and a term itself has to be opened to families before they can see anything in it. Families can only see a class once it’s published, and they can only enroll while an enrollment window is open. Miss any one of those and you’ll hear about it: families will say there’s nothing to sign up for.
So the order you set things up is the order you’ll work in:
- Create the term (and, the first time, its time slots and rooms).
- Open the termto families, if it isn’t already — new terms created after your first one, and every term you copy, start closed.
- Add your classes to that term.
- Publishthe classes you’re ready to offer.
- Open an enrollment window so families can register.
The rest of this guide takes those steps one at a time. If your term already exists and is open, skip ahead to building your class list.
Start with a term
A term is the container for everything else: Fall 2026, Spring semester, a six-week summer session, whatever matches how your co-op runs. Head to Admin › Terms & Schedule to create one.
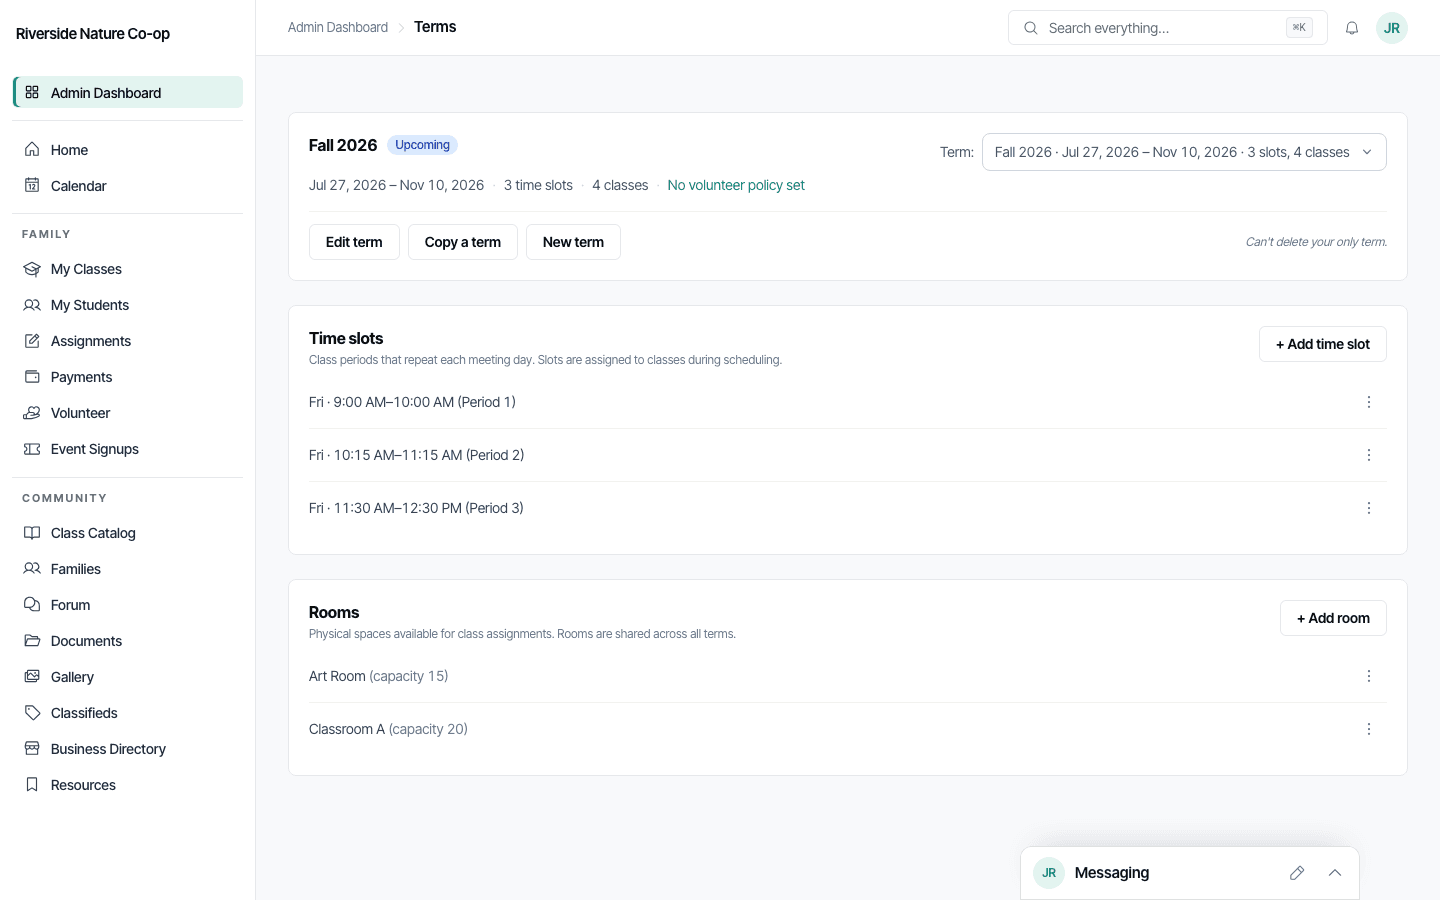
The first time you set up a term, take a minute with the two sections below it. Time slots are the class periods that repeat on a meeting day, like a 9:00 to 10:00 first period. Roomsare the physical spaces you assign classes to. You don’t have to use either one, but if you want a class to show a meeting time or a room, set them up here first, because the class form pulls from these lists.
Open the term to families
A term also has its own on/off switch for families, separate from everything else in this guide. On the term’s card at Admin › Terms & Schedule, a badge reads either Opened or Not opened. Until a term is opened, families can’t see it at all: no term-start review, no class catalog, no volunteer shift or event signup tied to it, even if you’ve published classes and opened a registration window inside it.
A co-op’s very first term opens itself automatically, so a brand-new co-op is never stuck behind an extra step. Every term after that — whether you build it from scratch with New term or bring one over with Copy a term — starts closed. Click Open termon the term’s card when it’s actually ready to go live for your families.
Build your class list
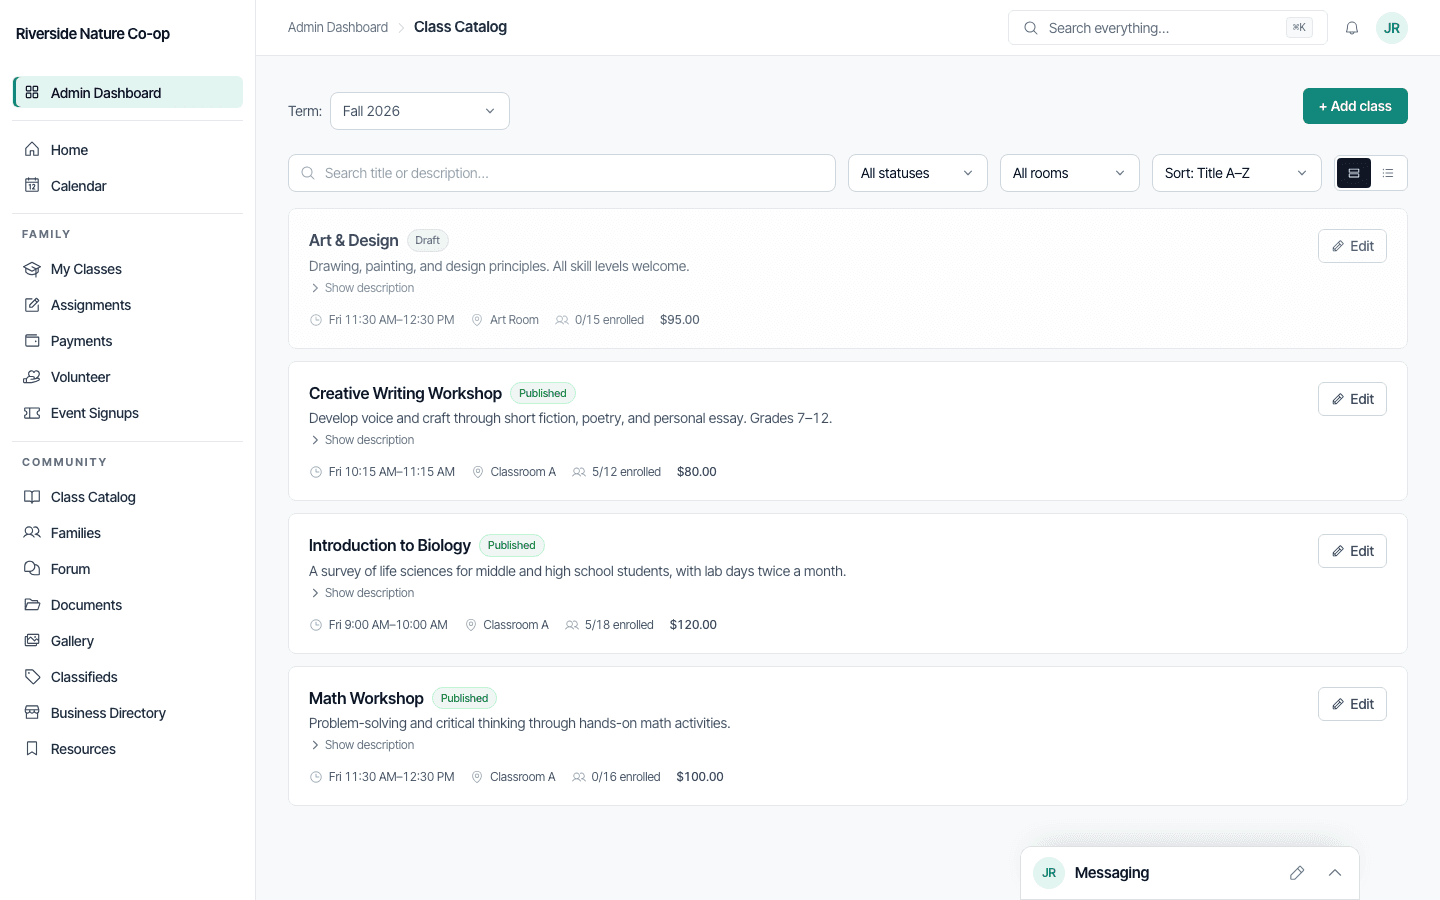
With a term in place, go to Admin › Classes. The page header reads Class Catalog, with a term switcher near the top so you can confirm you’re adding to the right term. Click + Add class to open the New class form.
Here’s what each field does:
Title
The class name families see, like “Introduction to Biology.” This is the only required field.
Description
Optional, but worth writing. This is where a family decides whether the class is right for their student.
Grade level
Optional. Use it to signal who the class is for. It helps families filter and helps you spot a fourth-grader who landed in a high-school chemistry class by mistake.
Capacity
How many seats the class has. It defaults to 20. Once those seats fill, additional students join a waitlist instead of enrolling, which the system handles for you.
Room and Time slot
Both optional, and both pull from what you set up in Term Settings. If either list is empty, the form links you back there to add some. If you pick a room and time slot that another class in the same term already has, saving is blocked with a message naming the conflicting class. Change one of them to resolve it.
Fee ($)
What the class costs a family. Leave it at 0 for a free class. Collecting fees online requires the Plus plan and a connected Stripe account; without that, the form points you to upgrade and the class stays free.
Click Create class and repeat for each class you offer. New classes start as a draft, so nothing is visible to families yet.
After a class is created, open it and look for Enrollment settings to set its payment collection mode, whether families pay at enrollment via Stripe or are billed to their account for you to collect later. The co-op-wide default is set under Admin › Settings › General, in the Class enrollment section. Individual classes can override it. See the Payment collection modes section below for details.
Publish classes when they're ready
A new class is a Draft, which means it’s hidden from families. That’s deliberate: it lets you write descriptions, line up teachers, and double-check fees before anyone can see the class. When a class is ready, open it from the catalog and change its status.
Publishing makes a class eligible to appear to families, but they still can’t enroll until a window is open. That’s the next step, and it’s the one people forget.
Open an enrollment window
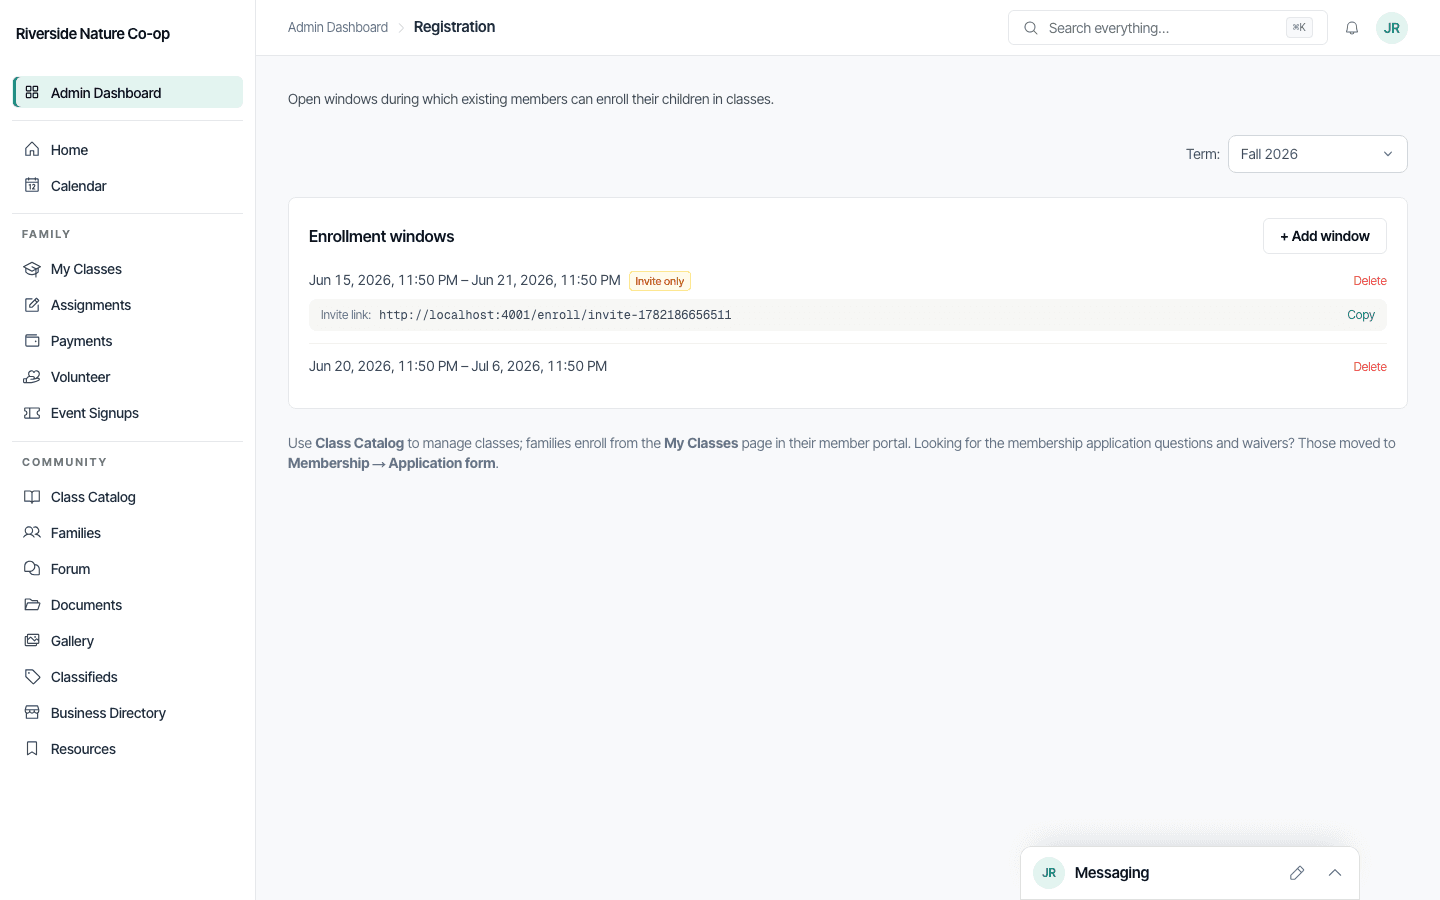
An enrollment window is the stretch of time when families can actually sign up. No open window means no enrollment, even with a term full of published classes. Go to Admin › Registration, titled Class enrollment, and find the Enrollment windows section.
Every window you add also shows up on the Community Calendar with its open and close dates, so families can see when enrollment starts without you announcing it separately.
Payment collection modes
When a class has a fee, you choose how families pay. Go to Admin › Settings › General and find the Class enrollmentsection to set your co-op’s default, and open any class to override it per class.
Require Stripe payment at enrollment
The default. Families pay by card the moment they enroll, using a secure Stripe checkout. Payment is collected before the seat is confirmed, so your roster stays clean. Refunds flow back through Stripe when you remove a student from the class.
Flexible — enroll now, bill the family’s account
Families enroll immediately without paying at that moment. The class fee is added to their Payments page as a pending charge, and you collect whenever it works for your co-op, by card online, cash at the door, or check. This is helpful for co-ops that prefer to settle up on meeting day or that already have a manual collection process. Outstanding balance restrictions still apply: families with an existing unpaid balance can’t enroll until it’s cleared.
Invite-only windows
When you add a window, you can check Invite link only. That turns the window into a private one: only families who have the secret link can enroll while it’s open. After you save an invite-only window, its row shows an Invite only badge and an invite link with a copy button.
This is how you give a head start to a specific group without opening the floodgates. Share the link with returning families, board members, or whoever gets first pick, and hold the general window for later. Anyone without the link can’t complete an enrollment during that window, even if they find the class.
Letting prospective families browse
Everything so far is for people who have already joined your co-op. If you also want prospective families to see what you offer before they apply, turn on the public catalog under Admin › Settings. Look for the Public class catalog option, which shows your published classes on your public co-op page. It needs your public page enabled first.
The public catalog and the enrollment window do different jobs. The catalog controls who can seeclasses, including visitors who aren’t members. The window controls who can enroll, and when. If you run an invite-only window while the public catalog is on, visitors can still browse the classes, but the catalog labels enrollment as invite-only and only people with the link can finish signing up.
By default the public catalog shows your currently active term, or the soonest upcoming one if none is active. To show a different term instead — for example, advertising next term’s classes before you’ve opened enrollment — use the Catalog term dropdown in Admin › Settings › Public Page. Set it back to Auto to return to the smart default.
Managing your roster during registration
Once families start enrolling, each class’s edit page becomes your roster. The Enrolled heading shows the count against capacity, like Enrolled (14 / 20), with the students listed below. Any allergies or medical notes a family entered show up next to the student, so a teacher checking the roster sees them without digging.
To take a student out of a class, click Remove on their row. For a paid class, the confirmation includes a checkbox to issue a Stripe refundfor that student’s seat, checked by default. If siblings paid together, only the removed student’s share is refunded. Teacher earnings aren’t adjusted automatically, so if you track payouts, square that up in Billing.
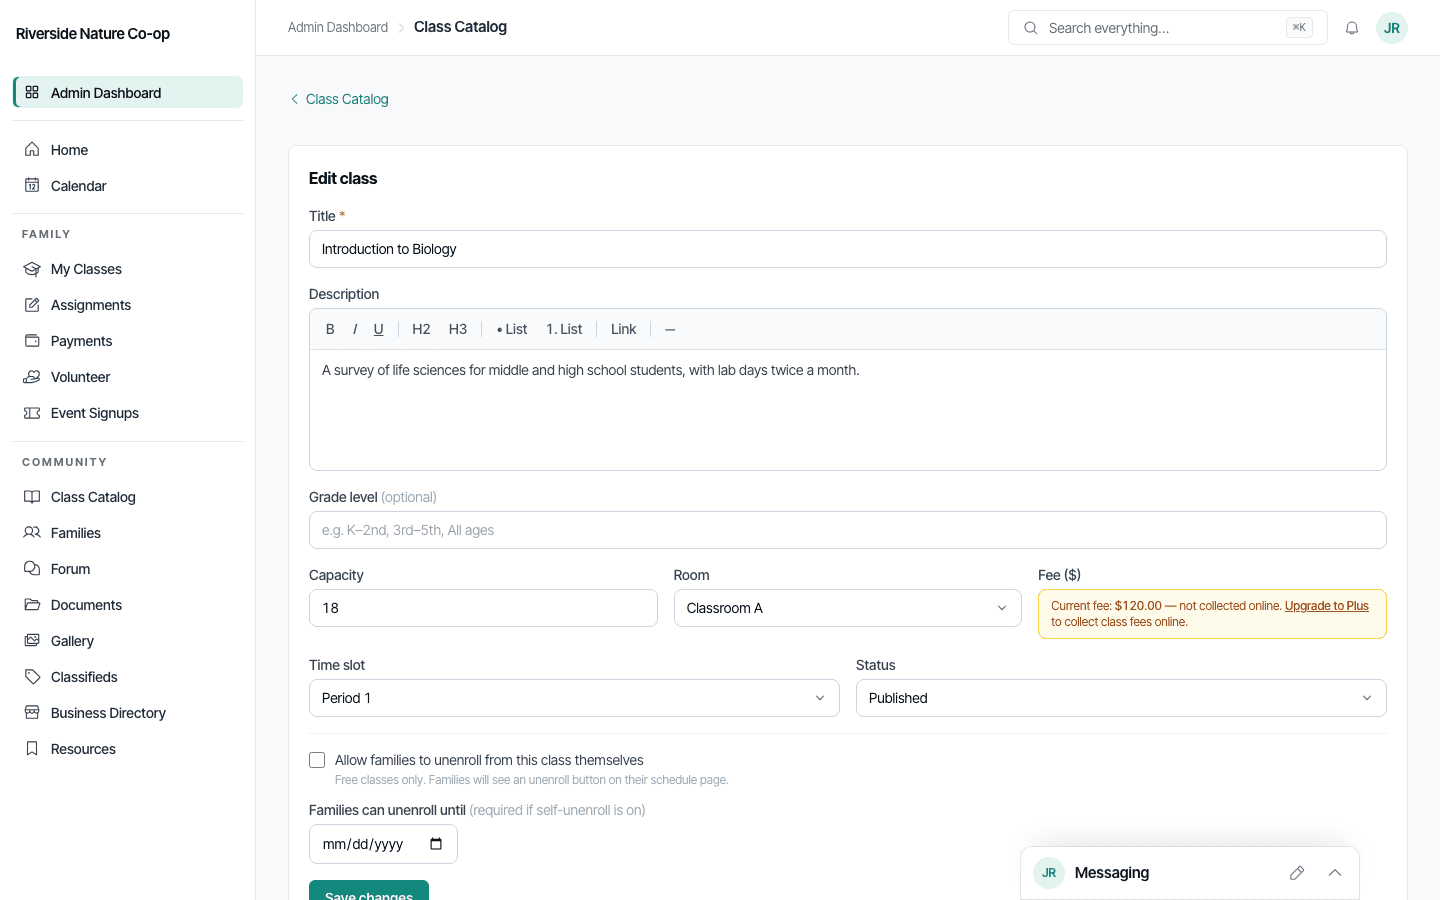
Need a class roster outside the app — for a substitute teacher, a printout, or a spreadsheet? A Download CSV button on the class’s edit page exports the full roster: name, grade, allergies, medical notes, and parent contact info. Teachers get the same export from the Roster tab in their Teaching view.
For a term-wide printout — every class grouped by day, time, and room, with its full roster, meant for posting in classrooms and the office — go to Admin › Emergency Roster. Day tabs at the top let you jump straight to one meeting day instead of scrolling the whole term, and each student shows their allergies alongside a parent or guardian’s name and phone number, so the page works on its own during a fire drill or evacuation without anyone needing to look anything up. It has its own Download CSV for the whole term and a Print button formatted for posting on a wall. Run it fresh each term, and again whenever the schedule changes.
Waitlists
When a class hits capacity, the next student to sign up joins the waitlist instead of taking a seat, in the order they registered. Seats are handed out one at a time under the hood, so two families registering the last seat at once can’t both land it. The class’s edit page shows a Waitlistsection below the enrolled students, in queue order, so the family who’s waited longest sits at the top.
When a seat frees up, or you decide to make room, click Promoteon a waitlisted student. For a paid class, the confirmation tells you the fee will be added to that family’s balance, then the student moves into an enrolled seat. You can also Removea student straight from the waitlist if they’ve found another option.
What families see
Members enroll from Class Catalogin their own dashboard. Each published class shows its open seats, like “6 seats remaining” (or “No seats remaining” once it fills), and a button to register. When they register, they pick which of their children to enroll, and the button adapts to the situation: Enroll & pay with the total for a paid class, a plain Enroll for a free one, or Join waitlist when the class is full.
Families with an invite link reach the catalog through it and see a short banner confirming the link is active. Prospective families looking at your public co-op page see the same classes if the public catalog is on, and they’re sent to sign in when they try to register.
Common questions
I published my classes but families say they can’t enroll.
First, check Admin › Terms & Schedule and confirm the term’s badge reads Opened. A term you just created or copied starts closed, and a closed term shows families the same “Registration hasn’t opened yet” message they’d see with no window at all — even with published classes and an open window inside it. Click Open termif it isn’t already.
Second, check Admin › Registration and confirm a window exists and its Opens time has already passed. Publishing a class and opening a window are separate steps, and a class can be fully published with nowhere to enroll.
If both of those check out and it’s a returning family (one that was already a member before this term), there’s a third possibility: HomeschoolGo asks every returning family to confirm their information at the start of each new term before the catalog opens up for them — and again if you’ve edited a waiver and explicitly required a re-sign. If they haven’t gotten to that step yet, they’ll land on a Confirm your informationpage instead of the catalog. The same check also guards volunteer shift and event signup, so a returning family can get blocked there too even if they never open Class Catalog. There’s no admin view of who has or hasn’t completed it, so if a returning family says they’re stuck, ask them to log in and check whether that page comes up, or whether their dashboard shows a “Confirm your family’s information” banner.
Can I let returning families register before everyone else?
Yes. Add an Invite link only window, share its link with the returning families, and open a regular window for the rest a few days later. Both can target the same term and the same classes.
Do families pay an enrollment fee once, or every term?
Every term, if you charge one. Each term has its own enrollment fee, set on that term’s Edit termdialog under Admin › Terms & Schedule — it’s not a one-time, co-op-wide setting. A family pays it once when their application is first approved, and again at the start of any later term that has a fee configured, as part of that term’s review step. See the Setting Up Your Co-op guide for the full breakdown.
What’s the difference between Closed and Draft?
A Draftclass is hidden from families entirely, which suits a class you’re still preparing. A Closed class stays visible but takes no new enrollments, which suits a class that filled up or that you want to stop sign-ups for while keeping the current roster.
A family paid, then needed to drop. How do I refund them?
Open the class, click Removeon that student, and leave the Stripe refund checkbox ticked. Only that student’s share comes back if siblings paid together. If you track teacher payouts, adjust those separately in Billing, since a refund doesn’t change a teacher’s recorded earnings on its own.
Do I have to use rooms and time slots?
No. They’re optional. Set them up only if you want classes to show a meeting time or a room assignment. Plenty of co-ops run registration without either.
Still have a question? Head back to the Help & Support page or reach out to your co-op admin directly from the dashboard.